Thursday, May 9, 2013

New Backsplash!

Oh, this brings me such joy.  The backsplash in this kitchen has been a source of frustration since we moved in.  First, it was nothing.  Just painted drywall.  Then we hung beadboard.  Not bad, but got super dirty super fast.  Then we put up these stainless steel subway tiles:


Not terrible, and I liked the way they looked with the dark granite.  From day one, we've really just wanted white subway tiles.  7 years ago, though, they were brand-new and super expensive {at least for us}.

So I nearly fell off my chair a few weeks ago when I realized how inexpensive they are now.  And then, I fell in love with some marble subway tile at Lowe's.  Ohhhhh, I loved it.  It took a few days {and some googling of pictures} to convince Nic, but finally I got the go-ahead.

Once I saved up enough, we skipped into Lowe's, only to discover that they were sold out.  Cue the almost-tears.  On a whim, we went next door to Home Depot {so convenient!} and found that they had the same thing, only cheaper.  Win!

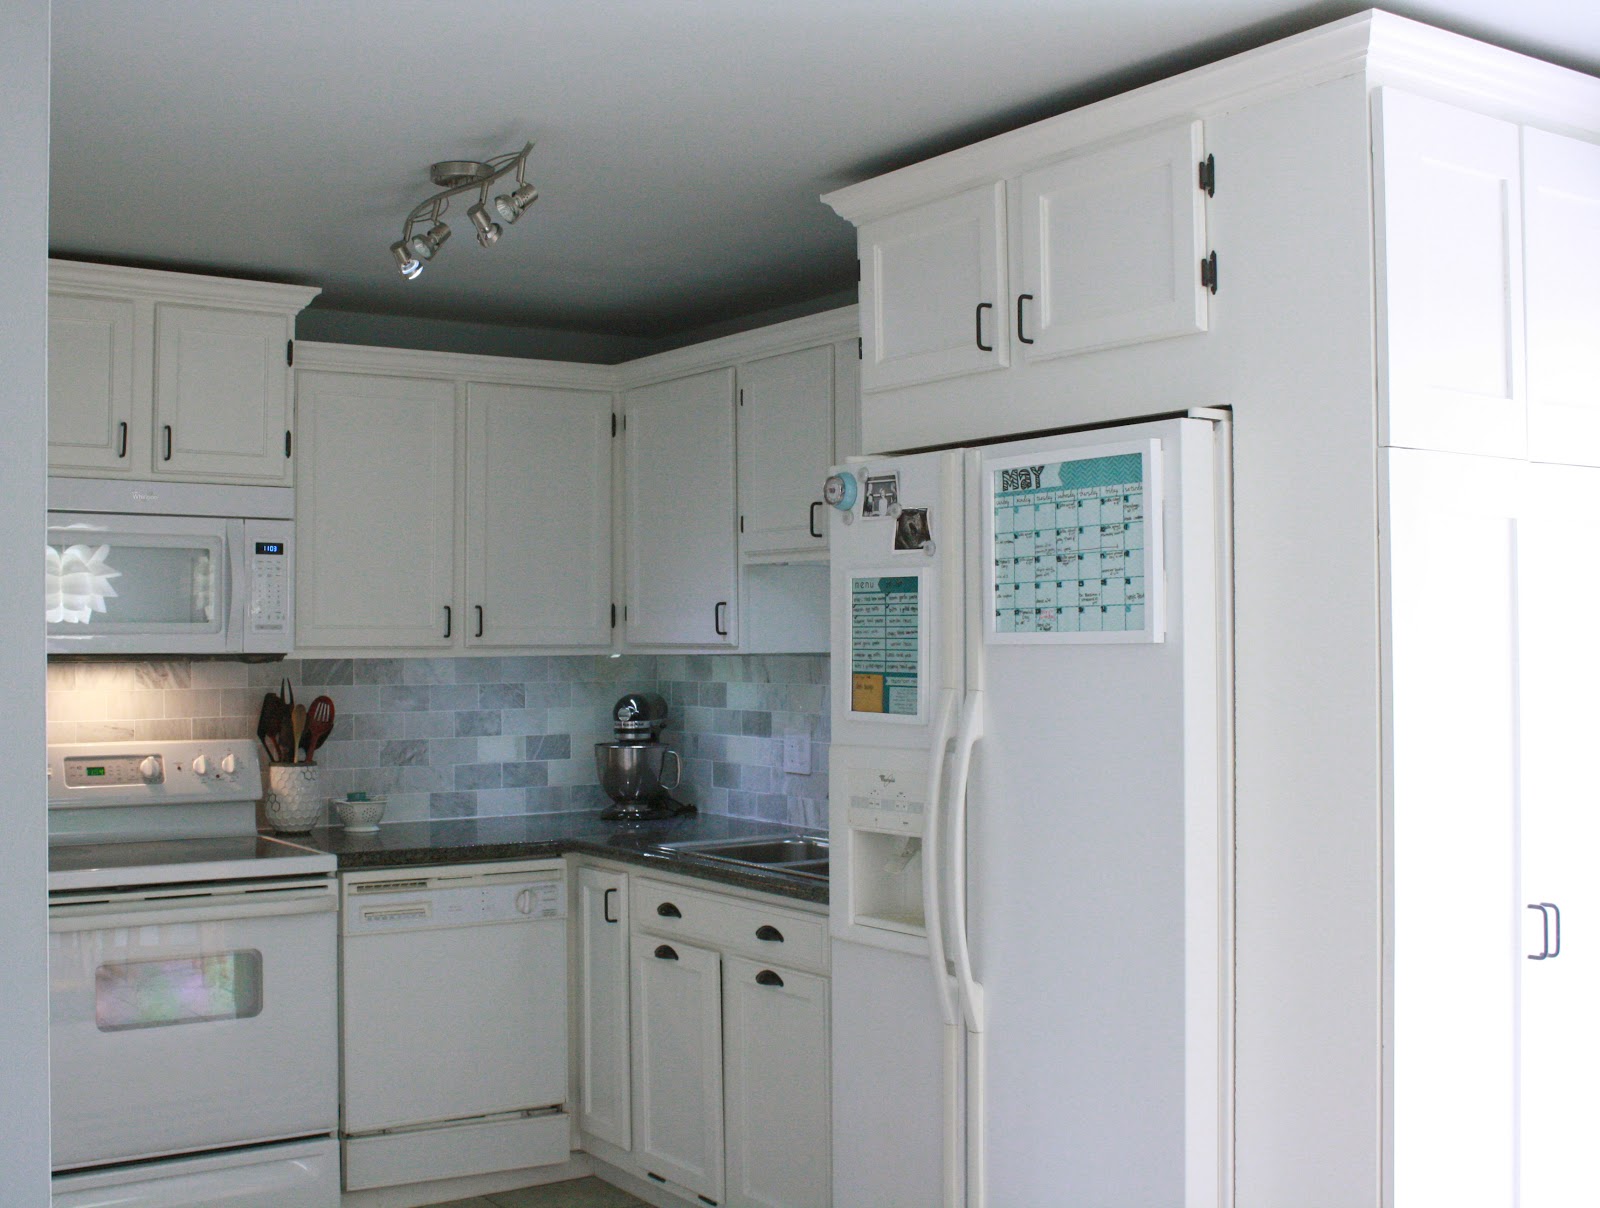
After a few days of tiling, grouting, and caulking, behold:


And because two pictures of the same room aren't enough...


I can't get over it.  It literally takes my breath away every time I walk into the kitchen.  Here's a before/after of when we started, to where we are now:


I get that this probably doesn't seem like a huge difference to most people, but dang it, we love it and are so proud of ourselves!


Saturday, May 4, 2013

How to Paint Cabinets {The Legit Way}

Ok!  In a previous post, I discussed all the reasons why white cabinets make my heart sing, and why I just can't keep from painting every cabinet in my life.  And why the expensive cabinet paint is the ONLY way to go.

Obligatory before shot:


So after 7 years of learning, here's how you should *really* paint your cabinets.

  1. Talk to the pros.  Once you decide that painted cabinets are in your future, head over to a professional paint store {no, not lowe's.  or home depot.  or menard's.}.  I'm partial to Sherwin Williams, but in Ohio I loved the Benjamin Moore store.  Just find a few pros that you feel comfortable with, and hit them up for advice.  It's free.
  2. Prep.  This seems obvious, but take your cabinet doors off the cabinets, and remove every bit of hardware.  Set it all aside in a safe place.  We like to use clear ziplock baggies so we can write exactly what is included right on the bag {'upper kitchen cabinet hardware'}.  Make a note of anything that may need replaced.
  3. More Prep.  Since our cabinets were already painted a color that was close to our goal, our prep work was super easy.  We just had to lightly sand each piece with a fine-grit sanding block.  Our pros at Sherwin Williams said just take 30-40 seconds for each piece.  Super easy.  If you're starting with a wood finish, you'll need to do a little more.  Here's a good tutorial, but make sure you consult your local paint store!
  4. Fill the Holes.  If you're using the hardware that you just removed, you can skip this step.  For some of our pieces, we were replacing the hardware, though.  So for those, we just had to use basic drywall compound to fill the holes.  Lots of people love actual wood filler, but we've found that if you're going to be painting over the surface {instead of staining}, drywall compound works great, we always have a bucket sitting around, and it is cheaper.  Win, win, and win.  Wait for it to dry {usually a full 12 hours or more}, and then sand it smooth.  Sometimes more than one application is needed.  Yeah, this isn't a super quick project...
  5. Prime It.  Again, since our cabinets were already painted, a primer wasn't necessary for most pieces {too many coats of anything, even the good stuff = no bueno}.  For our cabinet fronts, though, we actually knocked out the existing beadboard panel and replaced it with a flat piece of wood.  So for those areas, I slapped on a quick coat of Zinsser Smart Prime.  It's a great primer, with fantastic reviews.  And it's pretty cheap.  For this, I just used a short angled brush so I could get all of the corners.
  6. Paint!  After the primer dries {not too long...an hour or two}, it's time to break out the big guns!  This is important.  Most people swear by a foam brush {to avoid those ugly brush/roller marks that scream, 'I did this at home!'}.  Guys, that it soooo 2010.  The new tool of choice:  the mohair brush.  Yeah, they're a few dollars more than the foam rollers, but they are so amazing.  Paired with the expensive paint, they are the secret to awesome-looking cabinets for cheap.
  7. But Wait.  Before you bust out that mohair, use a short angled brush {any brand will do...just make sure it is angled with a 2"-ish handle} to get any ridges/cervices/inside corners.  By doing this step first, you'll end up rolling out any brush marks.
  8. Ok, Go.  While that paint is still wet, use the mohair roller to roll a nice even coat over the cabinet.  Don't go too thick, but get an even application.  You'll start swooning over the amazing paint.  Both the Sherwin Williams and Benjamin Moore cabinet paints are self-leveling, and just leave the best finish.
  9. Let Those Puppies Dry.  Before your second coat, wait a couple hours.  If you let the paint dry properly in between coats, the end result will last longer and resist chips/dings/scratches.  Then go ahead and put another coat on, just like the first.  You might even need a third coat {hopefully not}.
  10. And Flip.  We've found it works best to start on the back side, so if you would happen to smudge it a bit when turning it over, it's just the back side.  Just don't skimp out on painting the backs or sides or anything.  Even if you think it won't show {it will}.
After the front and back is dry, you're ready to hang!  Keep in mind that the Sherwin Williams paint {not sure about Benjamin Moore} takes 2-3 weeks to fully cure and harden.  It will be dry in a few hours, but you'll just want to be a little more careful that usual for a few weeks.  We considered waiting to hang them, but there isn't a safer place in our house than hanging on the wall.  If we had a guest room or basement or something, though, we would have let them fully cure before hanging.

Here's our after:


Of course, we also removed the soffit, replaced the cabinet inserts, painted the hardware, and replaced some of the hardware.

Overall, painting your cabinets is pretty easy.  It can be time-consuming and tedious, but absolutely worth it.

Anyone recently paint their cabinets or planning on painting cabinets soon?

Wednesday, April 10, 2013

Painted {Cabinet} Lady

One of the many projects with our little kitchen-redo is re-painting our cabinets.  Here's my take on painted cabinets.  With the exception of our first year of marriage {suuuuuuper tiny overpriced apartment in college town}, we've always had white painted cabinets.  The rundown:

  • We bought this house in the summer of 2006, and the seller had painted the dark brown {don't picture pretty cherry wood or anything...picture crappy 80s builder-grade cabinets} cabinets white.  Too bad she didn't paint the inside and used about 3 too few coats.  Not a good look.
  • Soooo, not knowing any different {this was before the influx of home-improvment blogs or Pinterest, if you can remember such a time}, I went to Menard's and bought a gallon of Dutch Boy kitchen & bath paint and went to town.  With a regular paintbrush.  Wah, wah.
  • My sweet mother-in-law did replace the ugly cabinet door inserts with beadboard.  Huge improvement {I'd share the before pics, but our dinosaur computer ate them all a few years ago}.

  • Things remained much the same over the next several years, and then we moved to Ohio for a year and rented our house.
  • While in Ohio, our apartment had these terrible yellow-orange fake wood cabinets.  It took me about 2 hours to high-tail it to the nearest Lowe's to grab some paint.  Again, I failed to do any research and just painted away our deposit {totally worth it, btw}.
So.  Back in our house, getting ready to revamp the kitchen, it was time to assess the cabinet situation.  I like white cabinets.  I feel like they make the kitchen look clean, big, and I think they have a timeless look that works with any decor style.  But I hate white cabinets.  I keep a pretty clean house, but those suckers are tough to keep clean.  Especially with little hands around.  And husbands.

I always said that if I ever changed our cabinets, I'd make them gray or something.  But when it came down to it, I went with white again, mostly because of our existing countertops.  We installed slate gray granite about 4 years ago, and love it.  Not interested in changing it {you can see it in the pic above}.  I was afraid that if I painted the cabinets any color other than white, it would be too dark for our window-less {and tiny} kitchen.  And believe you me, I Pinterested the crap out of it.

So white it is.  This time, though, I really did my research.  I literally had dreams about white cabinets, so suffice it to say that I was obsessed.  Behold, the fruits of my labors:
  • After extensive Googling and Pinteresting, I decided on Benjamin Moore's Simply White.  I wanted something that would 'read' as white, but have a slight color so that it would help hide fingerprints and add some depth to the cabinets.  So many good things were said about Simply White, so that's what I went with.  It did not disappoint.  It looks a little on the 'creamy' side here, but it reads white.  And beautifully so.

  • The next big decision was the type of paint to use.  I knew for sure I was NOT going to be using the $20/gallon stuff.  That is just fine for walls, but I knew from the past 7 years that cabinets require the good stuff.  The two top contenders were Benjamin Moore Advance Paint and Sherwin Williams Pro Classic.  Both are self-leveling {amazing!!!}, and both come equally recommended in the blogosphere.  I just love our Sherwin Williams store, so I went with them.  They are so helpful and kind, so I knew that if I had problems, they'd be there to help.
  • Yes.  This paint is expensive.  They were having a 30% off sale, so 1 gallon, along with some supplies, was $60.  I can't tell you enough how worth it this is!  Cabinets take a beating, and you just need to use the expensive stuff.  Do it.
  • Proper prep work and good materials/tools are key.  I'll detail the steps I used in another post, but just don't skip the prep work.  That's what makes the cabinets last more than a few months.  My Sherwin Williams guy set me up with some tools I'd never used before, and those made all the difference, too.  I'll include all that info in the step-by-step post.
  • Finally, hardware is more important that you'd think.  We went with oil-rubbed bronze, and I can't even begin to tell you how much I love the contrast with the white cabinets.  We just had chrome before, and it was blah.  I took the time to hunt down affordable hardware that I loved {we did re-use the hinges}, and it makes all the difference.
So that's how we came to our white-cabinet decision.  I'll write up all the details in another post, with photos of our {kind of} finished cabinets!

Tuesday, March 26, 2013

Hear Me Roar: How to Use Drywall Tape

You know the feeling.  You want something done but the husband is doing something else you asked for/working the job that actually pays money/otherwise unavailable.  I'm normally pretty happy to be patient or to just do it myself, but I tend to leave the 'man jobs' for when Nic is available.

Well, after we'd finally tackled that terrible soffit, I was just dying to have the ceiling finished.

Nic was at work, and I found myself with two sleeping children and zero excuses.  We'd never used drywall tape in this house, but I figured it was time to do it right.  And by right, I mean give drywall tape a chance.  Obviously I'm no professional.

So I first just measured and cut the drywall.  When you're hanging drywall, you want as many studs to screw into as possible, but definitely two opposite each other.  You've just got to make sure the piece of drywall has something to grab onto and level itself out.  This often means cutting away more of the drywall than necessary to expose another stud.

As for screwing it in, just use drywall screws and a cordless drill.  You'll feel like a woman.  Roar.

Here's what we were looking like after I'd cut and hung the drywall.  Never mind that large hole between the drywall and the cabinet...there will be a thick piece of trim there.


The only things you really need for this are drywall putty, drywall tape, scissors, and a joint knife {the spreader thing}.


First up, just spread some drywall compound on the seam between the new drywall and the existing drywall {or two pieces of new drywall}.  It doesn't need to be smooth.


Next, cut a piece of drywall tape to cover the compound you put down.  I feel like the key is to do smallish areas.  Not too big, or it becomes unmanageable.


Then take your joint knife and smooth it out.  The idea is to take the putty that is under the tape, and smooth it out from underneath.  As you move the joint knife over the tape, you'll cover the top, too, and make a smooth {ish} seam.


It will look something akin to this when you're done:


And here's a bigger section:


We didn't have any 'outside' corners in this project, but we have several 'inside' ones.  I found these to be super easy.  Just fold the drywall tape in half {there's already a slight seam}, and then the steps are the same.


 The real key to nice-looking drywall, though, is to take your time.  After your tape is up, get as much air circulating as possible.  We pull in as many fans as possible, and if it's decent out, open up doors and windows.

Let it dry overnight {don't get impatient...it really needs lots of time to get really dry} and then sand it down using a fine-grit sanding block.  Get it nice a smooth, even if that means you have some divots.  Then bust out the drywall compound and apply another thin coat.  Let that dry, and sand it down.  We usually end up needing 2-3 different applications, though pros are much quicker.  They also cost money, so we choose to spend time over spending cash.

After you feel like it's really smooth, go ahead and wipe off the dust {ohhhhh that dust} and paint it.  We actually like to do this step even if we're not sure if we're done.  We've found it to be easier to tell if you actually need to do more smoothing if there is a coat of paint on.  Sometimes the different colors of the drywall, putty, and existing paint make it tough to tell.

You'll know when you're done because it will look like a flat ceiling or wall.

This was one of those projects that I thought was going to take forever and be really tough.  It wasn't.  It took about 2 days {since the drying time is so long}, but it was pretty simple.  If I can do it, so you can you!  Even sans husband/resident handyman!

Thursday, March 21, 2013

Soffit-B-Gone

Over this past weekend, we put to action the first baby-step of our house plan.  After deciding to wait until summer/early fall to add on our big family room, we figured we could knock out some of the 'smaller' projects in the meantime.

I say 'smaller' because this is kind of a big project.  Much bigger than we thought it would be.  But oh, soooo worth it.  We decided to knock out the soffit in our kitchen.


The soffit is the area between the tops of the cabinets and the ceiling that is drywalled in for absolutely no apparent reason.  It was the 'thing' to do in the 80's and early 90's, so lots of houses have them.  If yours has never bothered you before, I'm sorry...you might want to knock it down now.  We have always hated ours {hello...let's take a house with short ceilings anyway and make them even shorter by adding a soffit}.

Anyway.  I did the appropriate google-based research, and discovered the following:
  1. Most cabinets are screwed into the soffit.
  2. Many soffits are conduits for electrical works, plumbing, and even heating/cooling in some cases.
  3. Most soffits are just framed drywall work {so constructed like a wall, with a framework of 2x4s with drywall overtop}.
We arranged for the beloved Bampa {my dad} to take the kids on Saturday and got to business.  Here's a general idea of what we did and how we did it.

To start, we removed everything from the entire kitchen and removed the doors and hardware from the upper cabinets.  Basic prep work.  We also killed the power to the kitchen to make sure we weren't accidentally drilling or pounding into a live wire.


Then I carefully inspected the cabinets and discovered that they were actually secured to the wall, not the soffit.  Every kind of tutorial I could find about removing soffits took down the cabinets.  I absolutely didn't see the point, so we left them up.

Now for the fun!  I took a huge hammer and pounded into the soffit.  Nothin'.  Okay, so I hit a stud.  I moved over a few inches and.....nothing.  Another stud?  Impossible.  I let Nic have a swing and he wasn't getting anywhere, either.  We got out the power screwdriver and drilled into the wall.  Apparently the builders of our home were preparing for a major earthquake {in Indiana} because the entire soffit was a solid 2x8.


So we spent most of the day trying to hack the thing down.  With every bit of wood and drywall we could get down, huge loads of that terrible gray insulation would fall down.  It was terrible.  So messy and so uncomfortable to touch and breathe.  I was so glad our kiddos were out of the house.  We definitely should have had masks on, but compromised by opening up all of the doors/windows at a balmy 25 degrees.  I also wished we would have closed off the rest of the house with plastic.  Hindsight.


This is that insulation {the gray stuff}.  I think we filled about 6 extra-large garbage bags with it.

We did encounter a few things behind that soffit.  There were three different electrical lines that just needed re-routed.  There wasn't enough slack in any of them to actually move to another place, so we took the lazy/not-recommended/not-to-code route.  We just created a small trench in the framework so the wires would fit between the framework and the new drywall.

At long, long, long last, all of the framework was down.  Time to party!


From there, we measured and cut our sheets of drywall and screwed them into the exposed framework.  After spending the whole day elbow-deep in gross insulation, this part was actually pretty fun.  It seemed like we were finally seeing some progress.

At this point it was just a matter of finishing off the drywall.  I used drywall tape for the first time, and loved how easy it was.  I'll do a tutorial on that another time.  The drywall process does take a few days, because it is really important to let the drywall compound fully dry in between coats.


We actually ended up doing a few projects all at once, since it made sense to tear apart the kitchen just once.  We also added a broom closet at the end of the refrigerator, added crown moulding to the cabinets, and added a built-in microwave above our stove.  You can see those things in some of these photos.

It was so exciting to do what feels like such a huge transformation.  It may not seem significant, but to us it makes the whole kitchen feel so 'nice'.  Very fancy.

We've looked at hundreds of inspiration photos and toured lots of homes {both spec homes and 'real' homes}, and decided that one big 'key' to having a nice-looking kitchen is multi-level cabinets.  So when we installed the microwave above the stove, we made sure to hang the cabinet a little higher.  Another 'key' is having a built-in fridge.  I really wanted a broom closet, too, so we're currently working on finishing that up.

I'm not ready to share the finished photos yet, since I'm also painting the cabinets, but this should give you a good idea of how to hack into that ugly soffit.

Thursday, March 14, 2013

Wanna Clolor

That's what Henry says when he wants me to get down the crayons so he can eat them.

Since we've decided to move forward with some of the other renovations before adding on the family room, I've been thinking a lot about our whole-house color scheme.

Our house is small {duh}, and so I've always been of the mentality that the colors of each room need to blend and flow {wall color especially}.

Right now, here is what our wall colors are {is it weird that I have them all memorized?  no?}:

Overall, I've been so happy with it.  I would recommend Fresh Linen a million times over.  We get compliments on it all the time.  It's a great warm-but-not-fleshy tan.  I'm not thrilled with the Urban Sunrise in the bathroom {it just doesn't have enough warmth}, but it works.

Now that we're doing some re-arranging, we'll need a new color scheme, which is awesome because I love changing paint colors.

In the new plan, our entry hall, hallway, and kitchen will all share walls.  So I'll need a color that works for all three.  I'd like to have a colorful kitchen, but not sure that I want a really colorful hallway.  I've tossed around the idea of colored kitchen cabinets, and it's just not for me, for several reasons.  One of the big reasons is that we have a dark grey granite countertop, and so the white cabinets just brighten up our windowless kitchen.

So back to wall color.  I'm drawn to these colors, though I'm not committed to any of them:
benjamin moore stonington grey

benjamin moore revere pewter


I'm obviously drawn to grays.  Since our granite and backsplash are gray-toned, I'm not sure that another neutral would look right.  Then I'm thinking I can add the 'fun' and color to the kitchen with accents and artwork.


Thoughts?  Any awesome paint color recommendations to pass along?


Thursday, March 7, 2013

Weighing the Options

Things have been quiet on the home-improvement front.  I feel like we're hanging in limbo.

Mostly, it's not our fault.  I was really super angry about this, but I've come to terms with the fact that there's just nothing we can do about it.  In January, when we were deciding between adding on and buying a different home, I called to get pre-approved.

Well.  The news we heard wasn't good.  Sallie Mae, the owner of our souls {and Nic's student loans} accidentally 'left out' two of the loans {because we have, like, 30} when they were consolidated.  Our lovely collection of loans were due to be paid back in October, and we were faithfully paying each month.  Problem was, we had no idea about the two loans that were left out.  We weren't contacted, so we didn't know.

We found out, though, when our credit showed a past due amount for 120 days.  Wait!  What?!?  We are the kind of people who pay our bills.  I immediately called both Sallie Mae and the company that consolidates their loans, and lo and behold, no one would take the blame.  And even if they would have, credit history is pretty much written in permanent, non-washable Sharpie.

This caused our credit to drop significantly, and even though we called and made the accounts current that same day, they don't really care.  It takes credit a long time to go up {but it falls fast}.

The reason this is such a problem for us right now is that, after careful thought, we'd like to roll our addition into our mortgage.  Since our current interest rate is high {it's from 2006}, we can refinance at the same time, finance the addition, and not see much of a change in our current payment.  Awesome.

Well, except that we can't qualify right now because of someone else's mistake.

So here are our options:


  1. Sell this house and buy another {which requires a much lower credit score}.  But we don't want to do this.  Not even a little.
  2. Refinance the mortgage {without the new addition}, and pay for it out-of-pocket.  Not a terrible option, but we'd still have to wait at least a month.  I'm a terrible waiter.
  3. Wait 2-3 months, and then go ahead with the plan.  Yes, I know this is the best option.  I totally get that.  I just suck at waiting.  Big time.
We do have some things we can do in the meantime.  Our bathroom needs some TLC, and we can move forward with the plans to update our kitchen and knock down some walls.  And I could start painting doors black!!  I'm just getting very antsy, and our contractor is anticipating building costs to jump up.  Oh, and interest rates will be going up as soon as the unemployment rate goes down {not that I'm hoping for a high unemployment rate...}.

Mostly, it is just *so* frustrating that this is even happening, because we didn't do anything wrong.  Someone else {someone bigger} made a mistake and won't take responsibility.  I get that this is a first-world problem, and we're really blessed to have a safe, warm home and a healthy, happy family.

But it still sucks.

Know what else sucks?  When your furnace dies {beyond repair} in the middle of a snowstorm.  More details on that when we actually have some.